Exporting and Importing a Classic Catalog
There have been many times over the years where I’ve needed to export a subset of my main catalog for a specific reason, such as to travel or to share a selection of work, and then later needed to import any changes (and new photos) from that catalog back into my main catalog.
Exporting a Catalog
Let’s walk through the steps for how this can be done.
Step One:
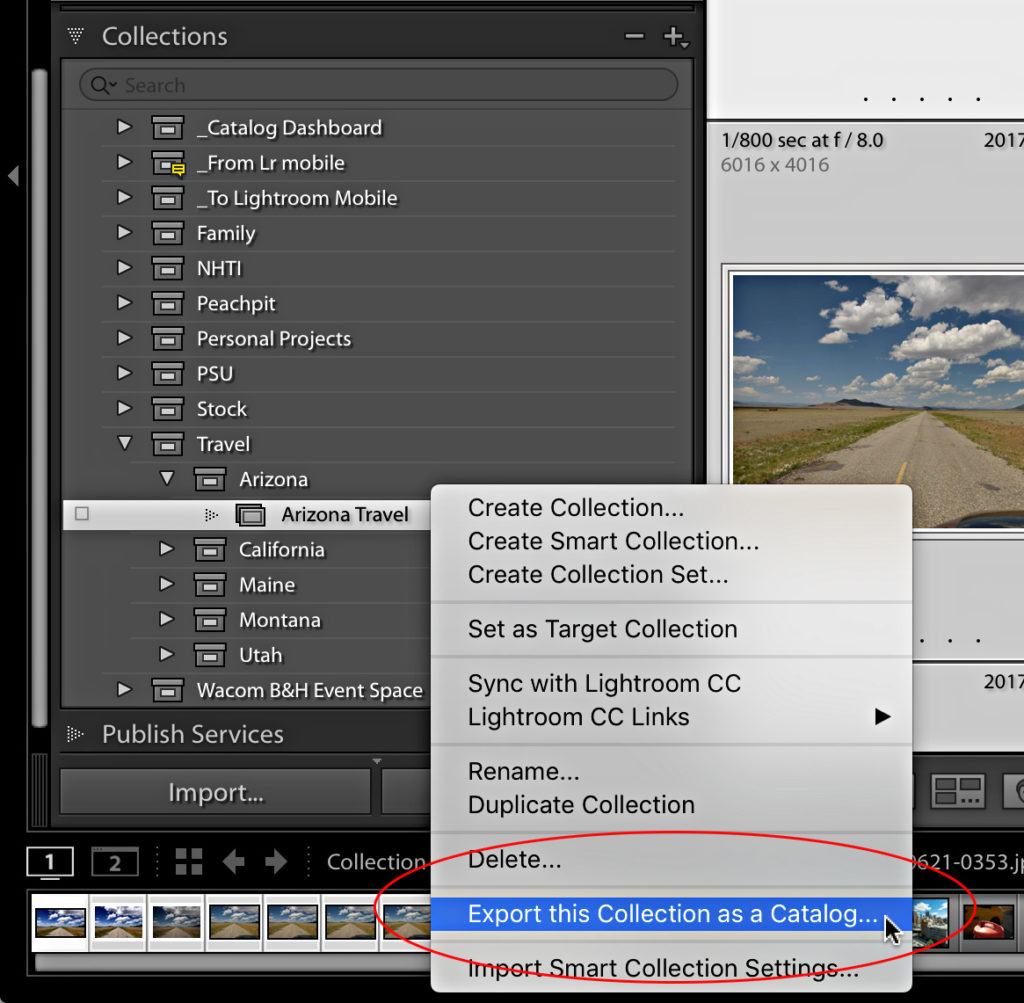
There are a couple of ways to export a catalog, but my favorite way is to put all the photos I want in the new catalog into a collection first. This way it doesn’t matter if the photos are stored across multiple different folders, as you can just drag and drop them all into a single collection to pull them together.
Once you have them all in the collection, Ctrl-click (PC: Right-click) the collection name and choose Export this Collection as a Catalog from the contextual menu that appears. This will open the Export as Catalog dialog box.
Step Two:
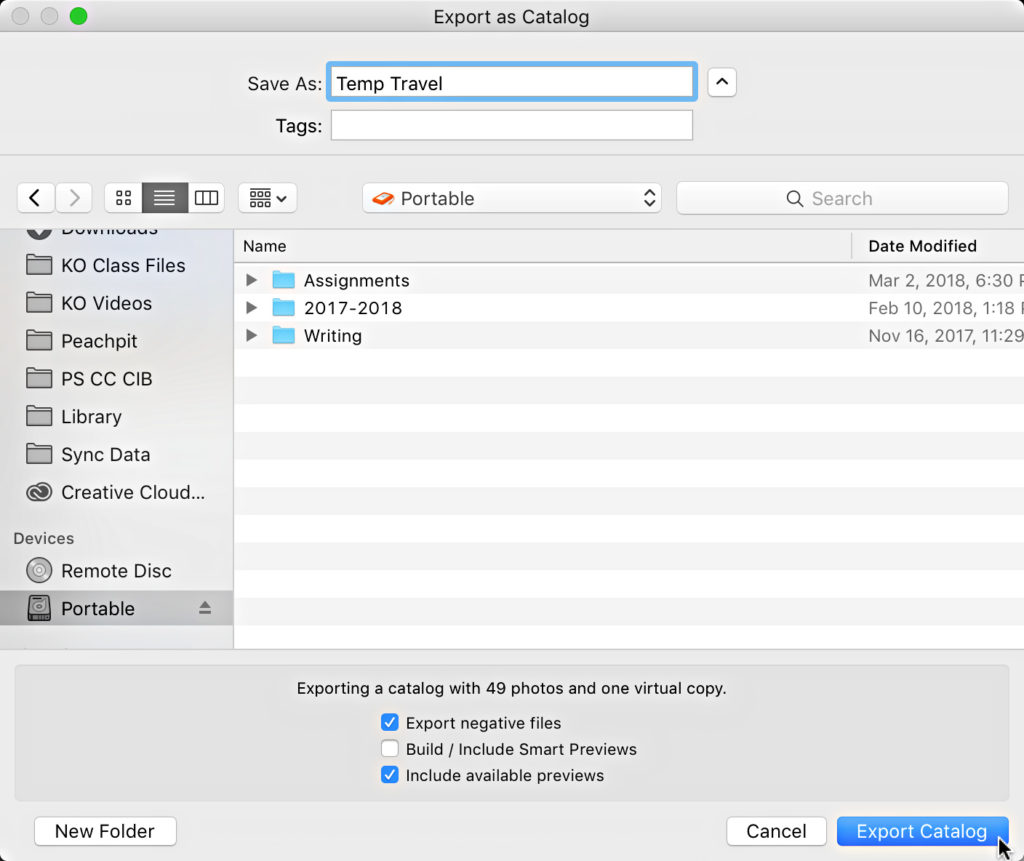
On the Export as Catalog dialog box, choose where you want the exported catalog to go and give it a name. Since I am planning to take this catalog on a trip I selected a folder on the external drive I am taking with me and gave it a name that made sense to me.
Step Three:
At the bottom of the Export as Catalog dialog box are three checkboxes. For this purpose I am checking Export negative files to include copies of the original photos along with the exported catalog file so that I can work on them in Develop and even send to third-party plug-ins. Checking Include available previews may cause the catalog export process to take a tiny bit longer, but it will save you the time later by not having to re-render them again.
Note, if you don’t need copies of the source photos you can choose Build / Include Smart Previews and use those instead. This takes up much less disk space than including negative files, but still allows for editing in Develop (albeit with smaller versions of the photos).
Step Four:
Click Export Catalog (PC: Save) to start the process of exporting the catalog, negative files (photos), and previews to the external drive.
Nothing about this process will change anything in my original catalog. All I am doing is duplicating the data about the photos in that collection in a new catalog file. If I go to File > Open Catalog, and select the new .LRCAT file, I can open that catalog file into Lightroom and verify all the work I’ve done—from keywording to virtual copies to Develop edits—on those photos is contained in this new catalog. By including the negative files it even replicates the same folder structure on the destination drive so I know these photos are where they should be for the trip.
From there it is just a matter of safely disconnecting that drive (close the catalog file first) from the first computer, connecting it to the second computer, and opening that catalog into Lightroom when I want to use it. To open that catalog file directly into Lightroom, just use your file browser to open the folder on the external drive and double-click the .LRCAT file. Now you are ready to head out on your trip, continue working on those photos in any way you wish, and import new photos you take along the way knowing that you can bring all of this work back to your original catalog.
That said, there is one mistaken assumption out there that I’ve seen quite a few people make. If you delete some of the original photos you exported with that catalog you cannot expect Lightroom to mirror those same deletions back in the original catalog when you import from that catalog. It just doesn’t work that way. You can only transfer data about your photos between catalogs, and once a photo is deleted the data about it is gone, so there is nothing to transfer. Long story short, don’t bring photos that you plan to delete, or better yet, instead of deleting just apply reject flags to them because that is data that will be imported back and you can delete all rejects from your main catalog.
Importing Back to Original Catalog
OK, now I have returned from my trip. I worked on each of the original photos I exported with the catalog and I have imported new photos taken while away. Here’s how to bring that all back into the original catalog.
Step One:
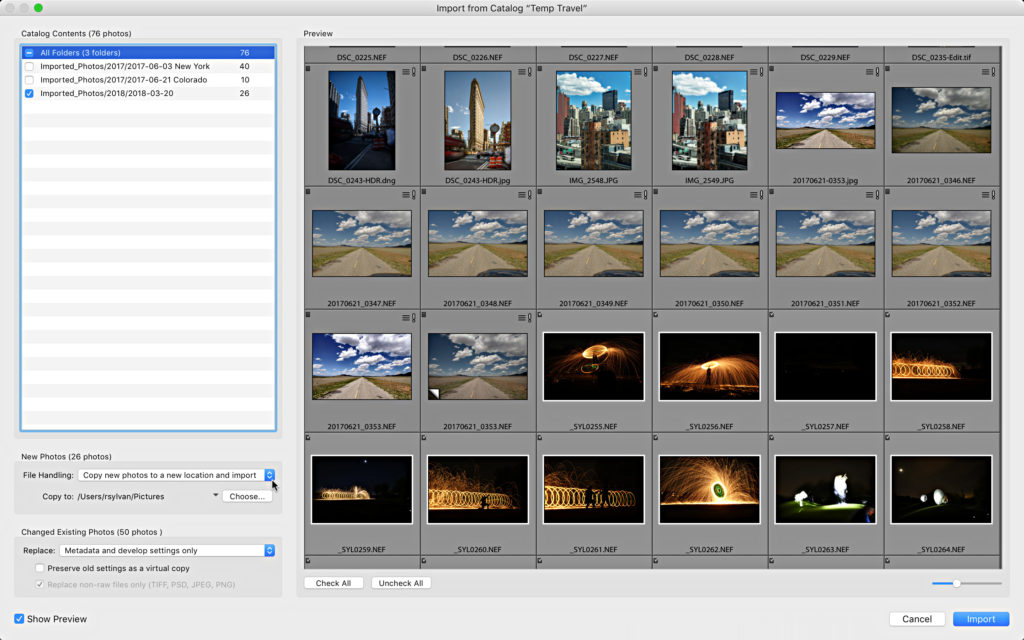
Connect the external drive to the original computer, open your original catalog into Lightroom, and go to File > Import from Another Catalog, then select the .LRCAT file on the external drive and click Open to launch the Import from Catalog dialog box.
Step Two:
First deal with the decisions in the New Photos section. Click the File Handling drop-down menu and choose between Add new photos to catalog without moving (i.e., add to catalog and leave on external drive), Copy new photos to a new location and import, or Don’t import new photos. I want to copy the new photos to my master storage drive, so I chose Copy new photos to a new location and import. Once you make that choice you need to tell Lightroom where to save the copies, so next to Copy to, click the Choose button and select the destination folder.
Step Three:
Decide how to handle the changes made to existing photos. Click the Replace drop-down menu and choose from Nothing, Metadata and develop settings only, or Metadata, develop settings, and negative files. I do want to replace metadata and develop settings in the original catalog with the work I did on the road, and I did not make any changes to the pixels in any of the negative files, so I chose Metadata and develop settings only. Under the Replace drop-down menu I have the option to Preserve old settings as a virtual copy. This is useful if you want to either compare the new work with the old work, or if you just want multiple versions of the work you did, but I am going to leave that unchecked so that the original files are simply updated.
Step Four:
Confirm all of the settings are configured the way you want them and click Import.
Lightroom then goes through the process of updating the changed original photos with the new work, copying the new photos to my main storage drive and importing them into the original catalog. This catalog export and import function is the only way to transfer all of the data stored in the Lightroom catalog between two catalogs, and the process is pretty straightforward when you understand the role of the catalog file throughout each stage.
Once the catalog import process is complete you have one more decision to make, which is, what will you do with the small catalog and the associated photos on the external drive that are now safely migrated to your primary system? The simplest choice is to just delete that catalog file, its preview cache, and the copies of the photos from the external drive. Consider it a temporary catalog that acted as a sort of transfer station while you were traveling and has outlived its usefulness. This will avoid clutter and confusion down the road.


