Starting Over from Scratch in Classic: Part 2
This is a continuing discussion that started last week. Be sure to check out Part 1 for context.
Preparations
Knowing what is at stake (last week’s post), let’s go through the things you should do before you start over. First, have a good backup of your catalog and of your photos. This is critical. You want the worst thing that can happen to be that you are right back where you started. This will give you some piece of mind, and the freedom to roll up your sleeves and get it done.
Next, you’ll want to try to resolve all (or as many as possible) instances of offline/missing files from your catalog. The reason for this is that Lightroom can’t write from the catalog to each photo’s XMP metadata if Lightroom can’t find/access the photo. If Lightroom can’t write to the photo’s XMP metadata, then you will lose all data about that photo stored in the catalog. I’ve written an article that details all of the ways to reconnect those missing/offline photos for anyone that needs help there.
The whole point of this exercise is to have Lightroom write from the catalog to all photos so that when you re-import them into a new catalog later you will preserve as much of the work you have done previously in Lightroom as possible.
OK, now that all missing/offline files have been resolved, it is time to decide what you want to do about the things that can’t be written to XMP metadata (again, see last week’s post on that). I’ll also show you the steps you can take if you want to try to convert some of those things to a data point that can be written to XMP.
Note, you don’t have to do all the things I’m about to describe, only the ones that matter to you and your workflow. For instance, if you never used Flags, just skip that part.
Flags
If you use Flags and you want to preserve those in your new catalog you can manually convert those flags to Star Ratings. If you currently use Star Ratings as part of your workflow, then you could apply a Color Label in place of a flag instead. Basically, all you are doing is filtering all photos by Pick Flag status in Grid view, then selecting all flagged photos, and then applying a Star Rating (or Color Label if that works better) that represents the Pick Flag for this purpose. Later, when you import the photos into the new catalog you could even convert them back to Flags if you wished.
STEP ONE: Press G to jump to Grid view, and click All Photographs in the Catalog panel.

STEP TWO: Click the Attribute button on the Library Filter bar, and then click the Pick Flag icon (white flag) to show only photos with a Pick Flag applied.
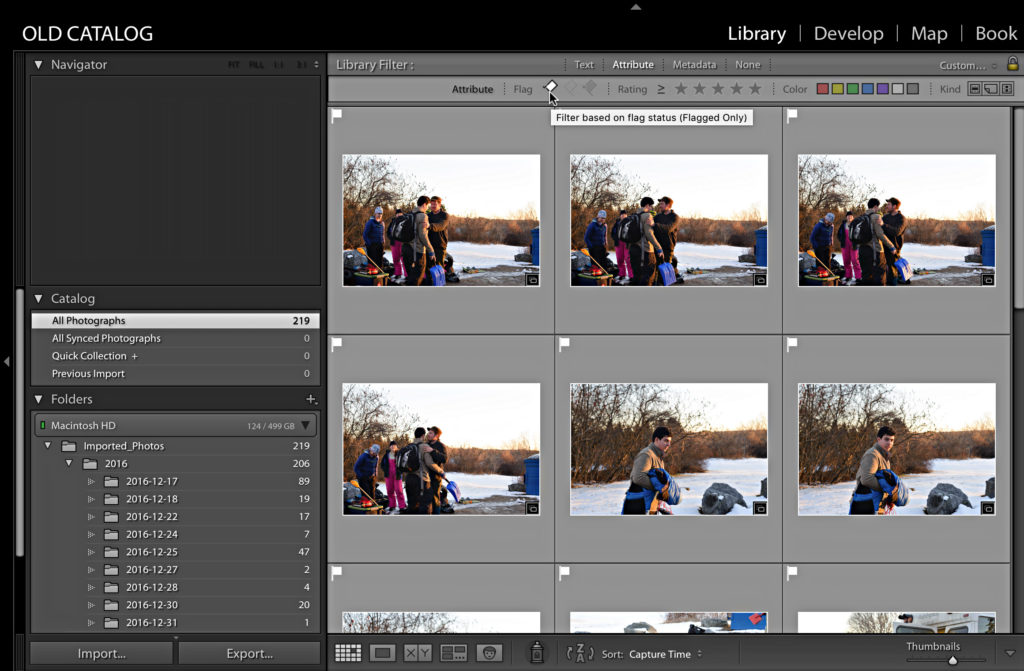
STEP THREE: Select all photos (Edit > Select All) and press the 1 key to apply a 1 Star Rating (or choose a rating level that works for your needs).
Now all the selected photos will have a Pick Flag and a Star Rating. Later, we’ll write from the catalog to each photo’s metadata and the Star Rating will be included.
Virtual Copies
One of the cool things about Virtual Copies is that you can save their settings as Snapshots, and Snapshots are available to the Master photo as well, and Snapshots can be written to XMP metadata. This means that you can take any Virtual Copy into Develop, click the plus sign on the Snapshots panel to create a Snapshot, and you will save the Lightroom settings of the Virtual Copy as a Snapshot. You’re probably thinking that would be a pretty tedious process to do with more than a few Virtual Copies, and you’d be right (but it would work, and can be done). Thankfully there is a third-party plug-in by a Lightroom user named Matt Dawson named Snapshotter that gives us the power to create Snapshots of all Virtual Copies with just a couple of clicks. The instructions for installing and using Snapshotter are available on the website, but here’s the basic steps once it is installed:
STEP ONE: Select All Photographs in the Catalog panel.
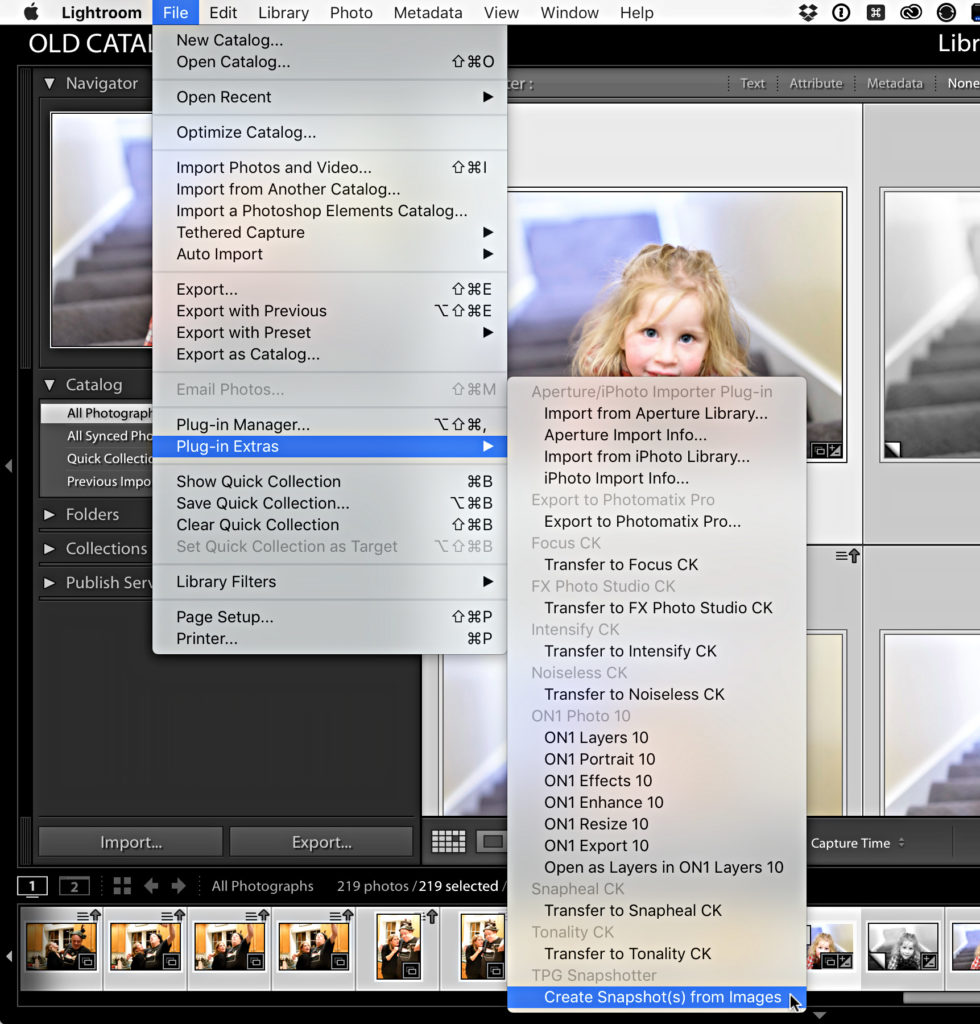
STEP TWO: Go to File > Plug-in Extras > Create Snapshot(s) from images.
STEP THREE: In the Snapshotter dialog box that appears, check the Virtual Copies Only? box so that Snapshots are only made for photos with Virtual Copies. Enter a name for the Snapshot (check the User Guide for more advanced naming options).
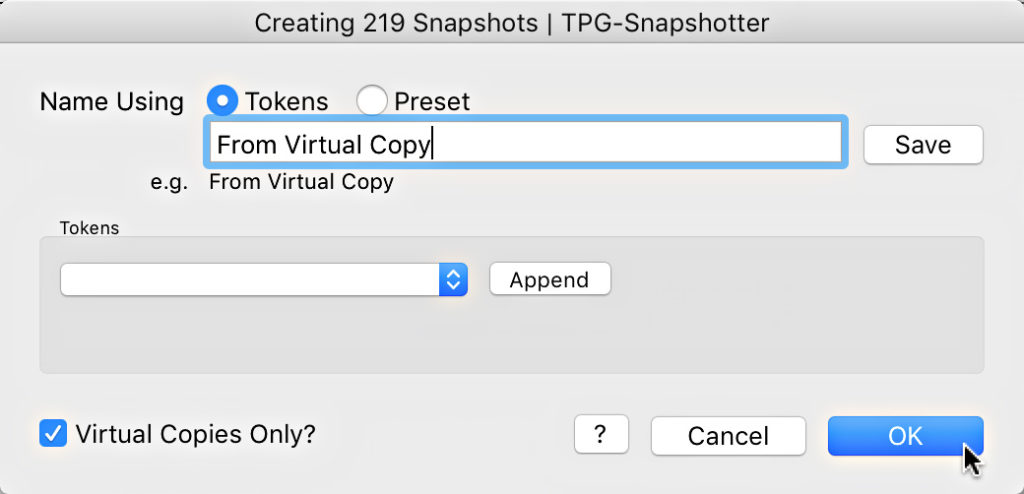
STEP FOUR: Click OK. The Snapshotter plug-in will create a Snapshot of the settings for each Virtual Copy.
Select a photo that has a virtual copy and press D to go to Develop and confirm the Snapshot is visible in the Snapshots panel. Pretty cool, eh?

Later you can build a Smart Collection with the rule “Has Snapshots is True” to automatically gather up all photos with a snapshot. (Optional) To re-create a Virtual Copy in the new catalog, select a photo, go to Develop, create a Virtual Copy, then select the Snapshot to rebuild the Virtual Copy.
Next week we’ll wrap this up with how to deal with collections and keyword lists before trying to bring it all into a new catalog.

