Beta Release of Adobe DNG Converter 11.2.1
I recently learned that Adobe quietly dropped a beta version of the free DNG converter to help people with newly released cameras (since the last official update in Feb) gain support for their raw photos in Lightroom and Camera Raw. I can’t remember the last time that happened, and I thought it was pretty cool for them to make this available in between official updates.
The following cameras are supported by this version of the converter:
- Canon EOS RP
- Panasonic LUMIX DC-FZ1000M2 (DC-FZ10002)
- Panasonic LUMIX DC-S1
- Panasonic LUMIX DC-S1R
- Panasonic LUMIX DC-ZS80 (DC-TZ95, DC-TZ96, DC-TZ97)
- Sony A6400 (ILCE-6400)
What does it do?
All the DNG converter does is create copies of your raw photos in the DNG format, which in turn makes them compatible with Lightroom and Adobe Camera Raw.
The only benefit of making the DNG conversion in the free DNG converter (as opposed to doing it in Lightroom itself) is if your version of Lightroom doesn’t yet support the raw files from your brand new camera AND there is an updated version of the DNG converter that does. This is one of those rare moments when this is true for the people owning the above listed cameras.
This would also be true for anyone still using a version of Lightroom that pre-dates the change to Lightroom Classic. It could also be true for someone who has a Creative Cloud subscription, but for some reason they need to remain on an older version of Lightroom Classic.
How do you get it?
You can find this current 11.2.1 Beta release here: https://feedback.photoshop.com/photoshop_family/topics/dng-converter-11-2-1-beta-released-for-interim-new-camera-support
The official page for the (non-beta) DNG Converter is here: https://helpx.adobe.com/photoshop/digital-negative.html#downloads
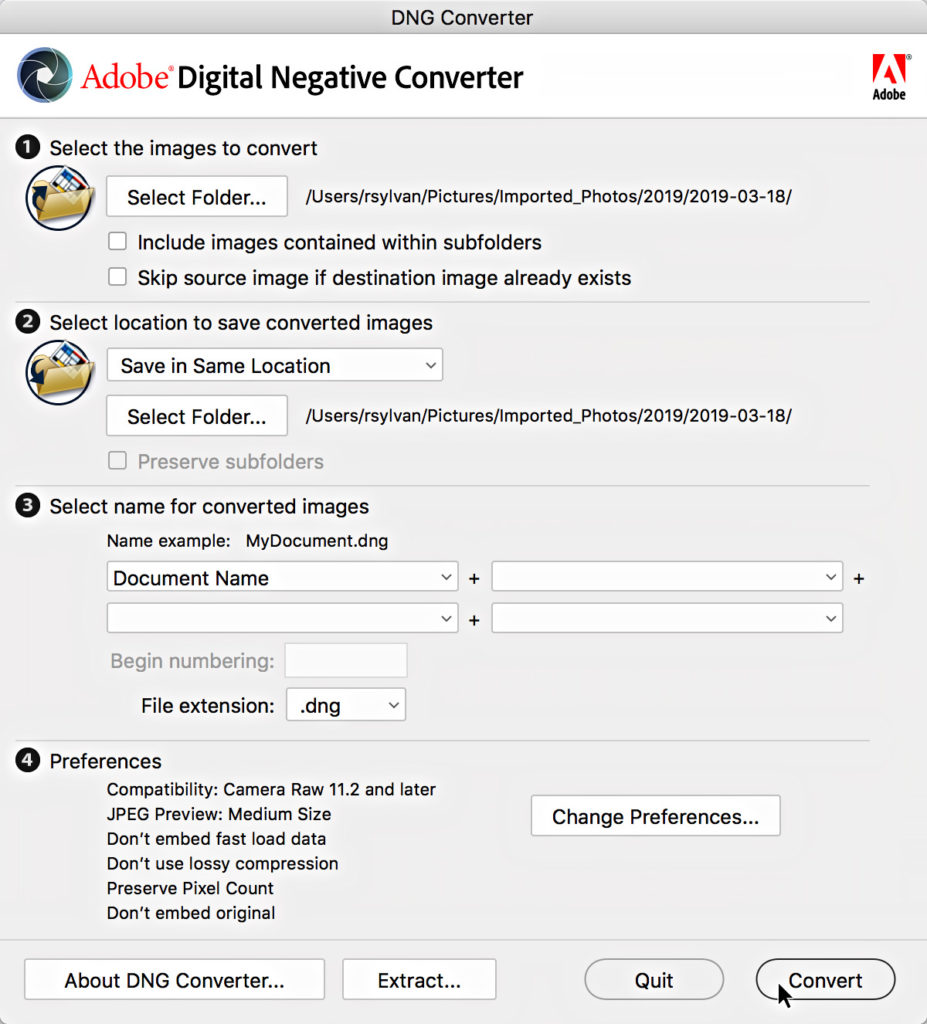
There’s a Read Me (PDF) file linked from the download page for the DNG converter that goes through the steps for installing and using the software, but there really isn’t much to it. In fact, the interface itself literally steps you through the process of selecting the folder containing the photos you want to convert through clicking the Convert button when you are ready to go.

Once the DNG files are created, you can bring them through the normal import process into Lightroom.
Extract?
It’s also worth noting that if you should ever choose the option for embedding a copy of the original raw photo in a DNG when converting that you can use this same DNG converter for extracting the original raw photo out of the DNG file. Just click the Extract button at the bottom of the dialog to open the Extract options. I don’t know anyone who chooses that option, but now you know.
Temporary Solution
Once the next official update to Lightroom and Camera Raw is released that update will include support for the above listed cameras (and possibly some newer ones) and those new camera owners will no longer need to use the DNG converter as a first step into Lightroom. But until that day comes, you have a free and easy way to get your raw photos back into your regular Lightroom workflow.
